
Combining microcontrollers, 3D printing, woodworking, and laser jet image transfer, this project will have something for everyone to learn.
Step 1: Tools and Materials
Materials:
Arduino
Stepper Motors
Hall Effect Sensor
Real Time Clock
Power Jack
Power Cable
USB Power Adapter
Heat Shrink Tubing
Hardwood (maple)
Magnets
Wood Glue
Painters Tape
Screws
Polycrylic
Tools:
Table Saw
Segmented Bowl Sled
Spring Clamps
Sandpaper
Printer
3D Printer
Disc Sander
Spindle Sander
1/4 in. Rabbet Bit
Router
Drill
Drill Bits
Band saw
Jig Saw
Soldering Iron
Step 2: Cut Segments for Seven Segment "Week Day" Ring
Using the same method and calculations shown in my Segmented Bowl instruction, cut 21 segments that are 3/16 in. thick.


Glue together seven segments at a time resulting in three rings that are 3/16 in. thick each. This ring should be able to fit a 10 in. OD and 7 in. ID ring inside.
Step 3: Combine Rings
I knocked off the corners of the rings, but this is not necessary. Sand the faces of each ring until they are flat. I used 80 grit sandpaper glued to my table.


Glue together the three rings so the seams are alternating. This gives the rings high strength from gluing the side grain of the wood.
Step 4: Cut and Assemble 12 Segment "Month" Ring
Follow the same math included in my Segmented Bowl instruction to cut 36 segments for three 12 segment rings 3/16 in. thick.


Glue this ring and the next ring together in smaller sections. Sand each face as before and combine the three rings by alternating the seams to increase ring strength.
This ring should be able to fit a 16 in. OD and 13 in. ID ring inside.
Step 5: Cut and Assemble 31 Segment "Number of Day" Ring
Follow the same math included in my Segmented Bowl instruction to cut 93 segments for three 31 segment rings 3/16 in. thick.


Glue this ring and the next ring together in smaller sections. Sand each face as before and combine the three rings by alternating the seams to increase ring strength.
This ring should be able to fit a 22 in. OD and 19 in. ID ring inside.
Step 6: Apply Ring Template
Print out and tape together the 1:1 template and cut out the individual rings. This will aid in getting the rings the exact size necessary. There are blue tick marks to help with aligning the template to each segment.


Attachments download Circular Clock PDF
Step 7: Trim Each Ring
Using a disc sander and spindle sander, remove the wood to the outside circle of each ring.


Step 8: Print Ring Gears
Download and print the five files on this step. The names of each file include a set of numbers. The second number in the file name indicate how many of that file to print.


Assemble the rings and press three magnets into the flat hole (not countersunk screw holes) with the south pole facing the top. Magnets need to only be included on one segment of each ring.
Attachments
Name of Day of Week Ring Gear Segment 5.STL Download
Name of Month Ring Gear Segment 1 6.STL Download
Name of Month Ring Gear Segment 2 6.STL Download
Number of Day Ring Gear Segment 1 12.STL Download
Number of Day Ring Gear Segment 2 1.STL Download
Step 9: Route Ring Gear Groove
Using a 1/4 in. rabbeting bit, cut a rabbet on the back of each ring. If the ring gear doesn't quite fit, take light passes off the inside of the ring on the spindle sander then re cut the rabbet on the router until it fits. Use a 1/4 in. roundover bit to smooth the not rabbet edges.


Step 10: Attach Ring Gears
Using the depth stop on the drill press, drill pilot holes through the ring gear into the wooden ring. Secure with screws.


Step 11: Print Bracket and Spur Gears
Print Bracket and Spur Gears
Print off brackets, three spur gears, Arduino mount, and 12 standoffs for holding electronics (not shown here) on this step.

Attachments
Spur_v2.STL Download
Standoffs.STL Download
Stepper Bracket 1_v2.STL Download
Stepper Bracket 2_v2.STL Download
Stepper Bracket 3_v2.STL Download
Nano Mount.STL Download
Step 12: Ring Supports
Cut ring supports from a piece of hardwood that's 3/4 in. thick. Use disc and spindle sanders to refine shape.

Attachments Ring Supports.PDF Download
Step 13: Attach Stepper and Bracket to Support
Shave the top open part of the bracket down to allow room for the machine screws holding the stepper motor in place. Drill pilot holes through the bracket and secure with screws.


Step 14: Add Spline
The brackets needed to be shaved down in a next step. To keep everything aligned, I added a spline across the back using the table saw.

Step 15: Cut Front Face
On a 1/4 in. board that measures 13 x 6 in. apply the included template. I used a jig saw to roughly cut the sections out then smoothed them out with a sanding stick.


Finally use an 1/8 in. round-over bit on the front of the board.
Attachments Front.PDF Download
Step 16: Attach Supports
Glue supports in place. Position them using the completed rings.

Step 17: Attach Top and Bottom Standoffs
Attach wooden standoffs that measure 6 x 1 1/2 x 1 3/4 in. at the top and bottom. This will hold the rings away from the wall and give enough clearance for the electronics.


My pieces were just a bit larger, but I trimmed them to fit after the glue dried.
Sand and round-over edges.
Step 18: Attach Lables
For the transfer of ink I used the polycrylic method shown here. It's a simple but time consuming process.


Print off a few copies of the attached PDF so when you mess up you can try again right away. I was impatient with a few of the labels but I like the rustic look it provided. You can also touch up the labels with a sharpie or black paint.
Apply 3-4 coats of polycrylic to all rings and face.
Attachments Labels.pdf Download
Step 19: Insert Power Plug
Drill a hole the size of the threads on your plug. Then carefully drill a larger hole the outside diameter of the plug until the threads just stick out on the inside of the standoff.

Step 20: Assemble Electronics and Upload Code
Following the attached schematic, wire everything up and upload the code.


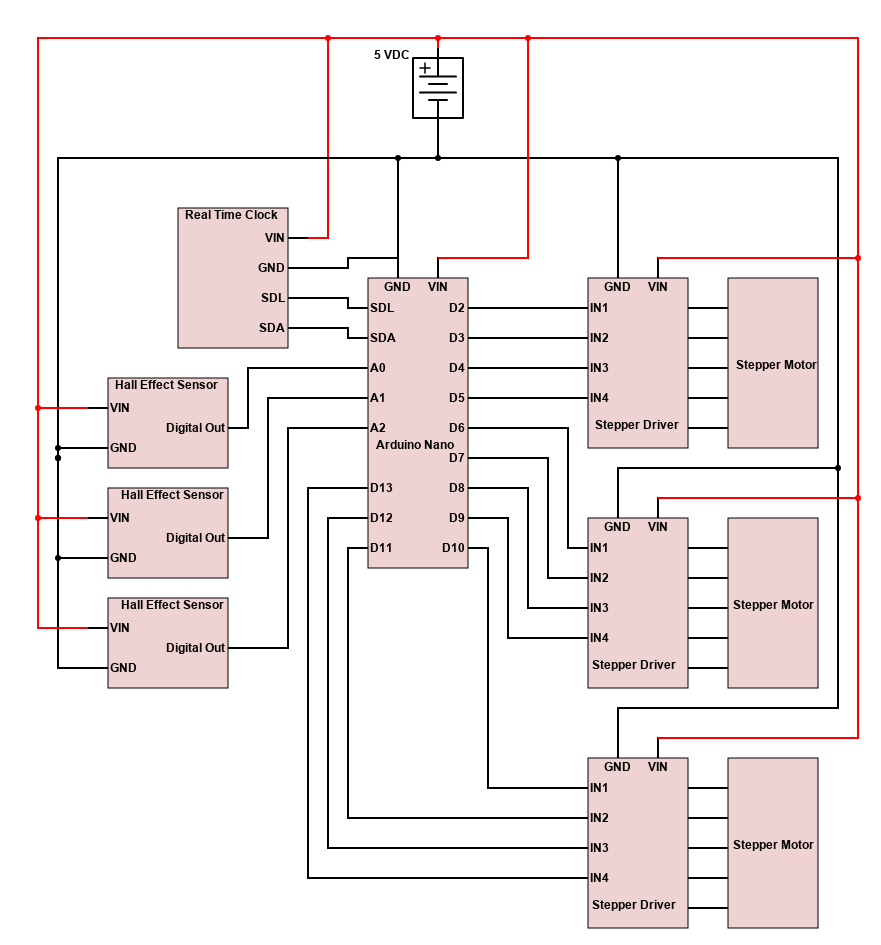
#include#include "RTClib.h" RTC_DS1307 rtc; // Call for steppers #define oneRotation 2038 // the number of steps in one revolution of 28BYJ-48 stepper motor Stepper numberOfDay(oneRotation, 2, 4, 3, 5); Stepper nameOfMonth(oneRotation, 6, 8, 7, 9); Stepper nameOfDay(oneRotation, 10, 12, 11, 13); // Location of the hall effect sensors used to find the home position of the rings. #define NUMBER_OF_DAY_SENSOR A0 #define NAME_OF_MONTH_SENSOR A1 #define NAME_OF_DAY_SENSOR A2 // Variables used to keep track of the current day. uint8_t thisNumberDay = 0; uint8_t thisMonth = 0; uint8_t thisNameDay = 0; uint8_t nextNumberDay = 0; uint8_t nextMonth = 0; uint8_t nextNameDay = 0; // Constants used to advance each ring one day/month. const int NUMBER_OF_DAY_TO_STEP = -1661;//1108 steps per day const int NAME_OF_MONTH_TO_STEP = -2946;//1965 steps per month const int NAME_OF_DAY_TO_STEP = -2745;//1831 steps per day const int COUNTERCLOCKWISE = -1; // Update these constants to adust the position of the rings at the reset position. // Negative numbers will advance the rings forward (counterclockwise) positive will reverse the rings. const int NUMBER_OF_DAY_RESET_ADJUST = -130; const int NAME_OF_MONTH_RESET_ADJUST = -60; const int NAME_OF_DAY_RESET_ADJUST = -35; // Bit used to test if the ring has been reset to home. bool NUMBER_OF_DAY_RESET = LOW; bool NAME_OF_MONTH_RESET = LOW; bool NAME_OF_DAY_RESET = LOW; void setup() { Serial.begin(9600); rtc.begin(); // Setup real time clock and reset hall effect sensors. pinMode(NUMBER_OF_DAY_SENSOR, INPUT_PULLUP); pinMode(NAME_OF_MONTH_SENSOR, INPUT_PULLUP); pinMode(NAME_OF_DAY_SENSOR, INPUT_PULLUP); // Uncomment line below to set time. // rtc.adjust(DateTime(2022, 1, 4, 23, 55, 0)); // rtc.adjust(DateTime(F(__DATE__), F(__TIME__))); // Get current date DateTime now = rtc.now(); thisNumberDay = now.day(); thisMonth = now.month(); thisNameDay = now.dayOfTheWeek(); Serial.print("Date: "); Serial.print(thisNumberDay); Serial.print(" "); Serial.print(thisMonth); Serial.print(" "); Serial.println(thisNameDay); // Set top speed of stepper motors. numberOfDay.setSpeed(15); nameOfMonth.setSpeed(15); nameOfDay.setSpeed(15); // Loop to move any ring off of the hall effect sensor if it is currently tripped. while (digitalRead(NUMBER_OF_DAY_SENSOR) == LOW || digitalRead(NAME_OF_MONTH_SENSOR) == LOW || digitalRead(NAME_OF_DAY_SENSOR) == LOW) { if (digitalRead(NUMBER_OF_DAY_SENSOR) == LOW ) { numberOfDay.step(COUNTERCLOCKWISE); } else { delay(1); } if (digitalRead(NAME_OF_MONTH_SENSOR) == LOW) { nameOfMonth.step(COUNTERCLOCKWISE); } else { delay(1); } if (digitalRead(NAME_OF_DAY_SENSOR) == LOW) { nameOfDay.step(COUNTERCLOCKWISE); } else { delay(1); } } // Loop until all rings are at the reset position. while (digitalRead(NUMBER_OF_DAY_SENSOR) != LOW || digitalRead(NAME_OF_MONTH_SENSOR) != LOW || digitalRead(NAME_OF_DAY_SENSOR) != LOW) { if (digitalRead(NUMBER_OF_DAY_SENSOR) != LOW ) { numberOfDay.step(COUNTERCLOCKWISE); } else { delay(1); } if (digitalRead(NAME_OF_MONTH_SENSOR) != LOW ) { nameOfMonth.step(COUNTERCLOCKWISE); } else { delay(1); } if (digitalRead(NAME_OF_DAY_SENSOR) != LOW) { nameOfDay.step(COUNTERCLOCKWISE); } else { delay(1); } } // Use these functions to carefully adjust position of rings after it's been reset. numberOfDay.step(NUMBER_OF_DAY_RESET_ADJUST); nameOfMonth.step(NAME_OF_MONTH_RESET_ADJUST); nameOfDay.step(NAME_OF_DAY_RESET_ADJUST); // Move each ring to the correct number, month, and day of week for (int i = 1; i < thisNumberDay; i++) { numberOfDay.step(NUMBER_OF_DAY_TO_STEP); } for (int i = 1; i < thisMonth; i++) { nameOfMonth.step(NAME_OF_MONTH_TO_STEP); } for (int i = 0; i < thisNameDay; i++) { nameOfDay.step(NAME_OF_DAY_TO_STEP); } } void loop() { // Check the current day number DateTime now = rtc.now(); nextNumberDay = now.day(); // If the current checked day is different than it was last time it was checked, move the rings to the next date. if (thisNumberDay != nextNumberDay) { // Get the next month and day of week. nextMonth = now.month(); nextNameDay = now.dayOfTheWeek(); // If the number of the day is 1 (and it's not currently at 1) reset to 1 if (nextNumberDay == 1 && thisNumberDay >= 28) { while (digitalRead(NUMBER_OF_DAY_SENSOR) != LOW) { numberOfDay.step(COUNTERCLOCKWISE); NUMBER_OF_DAY_RESET = HIGH; } numberOfDay.step(NUMBER_OF_DAY_RESET_ADJUST); } // If the month is Jan and was Dec, rest to Jan. if (nextMonth == 1 && thisMonth == 12) { while (digitalRead(NAME_OF_MONTH_SENSOR) != LOW) { nameOfMonth.step(COUNTERCLOCKWISE); NAME_OF_MONTH_RESET = HIGH; } nameOfMonth.step(NAME_OF_MONTH_RESET_ADJUST); } // If the day is Sun but was Sat, reset to Sun. if (nextNameDay == 0 && thisNameDay == 6) { while (digitalRead(NAME_OF_DAY_SENSOR) != LOW) { nameOfDay.step(COUNTERCLOCKWISE); NAME_OF_DAY_RESET = HIGH; } nameOfDay.step(NAME_OF_DAY_RESET_ADJUST); } // If the ring wasn't reset to the beginning and needs to change, step to the next position if (NUMBER_OF_DAY_RESET == LOW && thisNumberDay != nextNumberDay) { numberOfDay.step(NUMBER_OF_DAY_TO_STEP); } if (NAME_OF_MONTH_RESET == LOW && thisMonth != nextMonth) { nameOfMonth.step(NAME_OF_MONTH_TO_STEP); } if (NAME_OF_DAY_RESET == LOW && thisNameDay != nextNameDay) { nameOfDay.step(NAME_OF_DAY_TO_STEP); } // reset check values to test each loop thisNumberDay = nextNumberDay; thisMonth = nextMonth; thisNameDay = nextNameDay; NUMBER_OF_DAY_RESET = LOW; NAME_OF_MONTH_RESET = LOW; NAME_OF_DAY_RESET = LOW; } delay(60000); }
Attachments
Attachments Circular_Calendar.ino Download
Step 21: Enjoy!
Now hang up your new calendar and always enjoy knowing what date it is without needing to use any brain power.

Attachments
Name of Day of Week Ring Gear Generated.DXF Download
Name of Month Ring Gear Generated.DXF Download
Number of Day Ring Gear Generated.DXF Download
0 Comments: