What we will need:
(1) Software: Arduino IDE
(2) Hardware: USB-COM converter
We still need USB-COM converter for uploading initial code for ESP12E which will be used for next upload by wifi
Step 1. Install Arduino IDE -> Firstly, visit here to know how to program ESP12E by Arduino IDE
Step 2. Install Python 2.7 (not installed Python 3.5) -> download here

Step 3. Choose BasicOTA project from example list

Step 4. Coding
Remember to change wifi name and password wifi, then save project with name myBasicOTA
Note with this line code: ArduinoOTA.setPassword((const char *)"123"); -> this is password (123) when you update firmware by wifi
Upload above code to ESP12E via COM-USB converter
Change ESP12E to run mode (GPIO0 connect to VCC). Then, run ESP12E -> result will show in Serial Monitor:


After input password, code will start uploading via wifi

After upload via wifi, check it out to see if local web is work or not


(1) Software: Arduino IDE
(2) Hardware: USB-COM converter
We still need USB-COM converter for uploading initial code for ESP12E which will be used for next upload by wifi
Step 1. Install Arduino IDE -> Firstly, visit here to know how to program ESP12E by Arduino IDE
Step 2. Install Python 2.7 (not installed Python 3.5) -> download here
Remember to select “Add python.exe to Path”:

Step 3. Choose BasicOTA project from example list

Step 4. Coding
Remember to change wifi name and password wifi, then save project with name myBasicOTA
myBasicOTA code
#include <ESP8266WiFi.h>
#include <ESP8266mDNS.h>
#include <WiFiUdp.h>
#include <ArduinoOTA.h>

const char* ssid = "your_wifi_name";
const char* password = "your_wifi_password";

void setup() {
  Serial.begin(115200);
  Serial.println("Booting");
  WiFi.mode(WIFI_STA);
  WiFi.begin(ssid, password);
  while (WiFi.waitForConnectResult() != WL_CONNECTED) {
    Serial.println("Connection Failed! Rebooting...");
    delay(5000);
    ESP.restart();
  }

  // Port defaults to 8266
  // ArduinoOTA.setPort(8266);

  // Hostname defaults to esp8266-[ChipID]
  // ArduinoOTA.setHostname("myesp8266");

  // No authentication by default
  ArduinoOTA.setPassword((const char *)"123");

  ArduinoOTA.onStart([]() {
    Serial.println("Start");
  });
  ArduinoOTA.onEnd([]() {
    Serial.println("\nEnd");
  });
  ArduinoOTA.onProgress([](unsigned int progress, unsigned int total) {
    Serial.printf("Progress: %u%%\r", (progress / (total / 100)));
  });
  ArduinoOTA.onError([](ota_error_t error) {
    Serial.printf("Error[%u]: ", error);
    if (error == OTA_AUTH_ERROR) Serial.println("Auth Failed");
    else if (error == OTA_BEGIN_ERROR) Serial.println("Begin Failed");
    else if (error == OTA_CONNECT_ERROR) Serial.println("Connect Failed");
    else if (error == OTA_RECEIVE_ERROR) Serial.println("Receive Failed");
    else if (error == OTA_END_ERROR) Serial.println("End Failed");
  });
  ArduinoOTA.begin();
  Serial.println("Ready");
  Serial.print("IP address: ");
  Serial.println(WiFi.localIP());
}

void loop() {
  ArduinoOTA.handle();
}
Note with this line code: ArduinoOTA.setPassword((const char *)"123"); -> this is password (123) when you update firmware by wifi
Upload above code to ESP12E via COM-USB converter
Change ESP12E to run mode (GPIO0 connect to VCC). Then, run ESP12E -> result will show in Serial Monitor:

It informs that ESP12E has IP address is 192.168.1.30
To check if ESP12E is connected to local wifi network, using "command window" to ping it

Step 5. Upload via wifi
In Arduino IDE, choose wifi connection for ESP12E
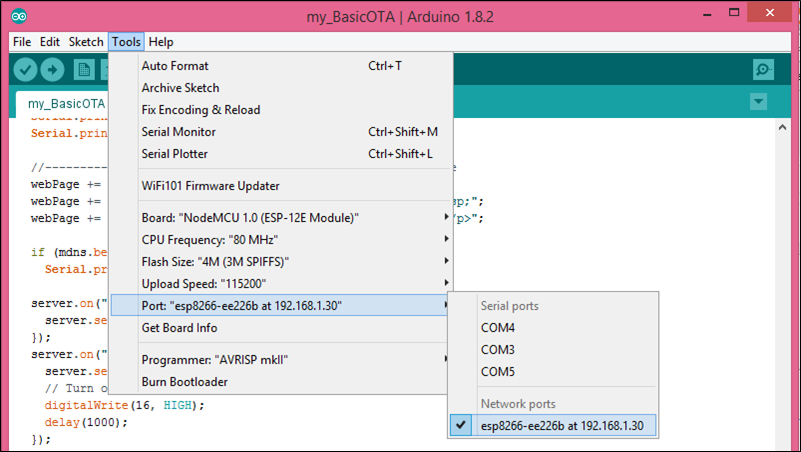
(If wifi connection not shown, restart Arduino IDE and check again)
Now press upload button (this will upload same code as in step 4), Arduino IDE will ask for password uploading (this case is "123", as code in step 4)


Step 6. Upload new code via wifi
In order to upload new code via wifi, the code for wifi connection must be kept.
Following is example code which puts local web control LED in pin16
myOTAcode local web
#include <ESP8266WiFi.h> #include <ESP8266mDNS.h> #include <WiFiUdp.h> #include <ArduinoOTA.h> //------------------------------for local web #include <WiFiClient.h> #include <ESP8266WebServer.h> MDNSResponder mdns; ESP8266WebServer server(80); String webPage; //----------------------------for local web const char* ssid = "your_wifi_name"; const char* password = "you_wifi_password"; void setup() { pinMode(16, OUTPUT); Serial.begin(74880); Serial.println("Booting"); WiFi.mode(WIFI_STA); WiFi.begin(ssid, password); while (WiFi.waitForConnectResult() != WL_CONNECTED) { Serial.println("Connection Failed! Rebooting..."); delay(5000); ESP.restart(); } // Port defaults to 8266 // ArduinoOTA.setPort(8266); // Hostname defaults to esp8266-[ChipID] // ArduinoOTA.setHostname("myesp8266"); // No authentication by default ArduinoOTA.setPassword((const char *)"123"); ArduinoOTA.onStart([]() { Serial.println("Start"); }); ArduinoOTA.onEnd([]() { Serial.println("\nEnd"); }); ArduinoOTA.onProgress([](unsigned int progress, unsigned int total) { Serial.printf("Progress: %u%%\r", (progress / (total / 100))); }); ArduinoOTA.onError([](ota_error_t error) { Serial.printf("Error[%u]: ", error); if (error == OTA_AUTH_ERROR) Serial.println("Auth Failed"); else if (error == OTA_BEGIN_ERROR) Serial.println("Begin Failed"); else if (error == OTA_CONNECT_ERROR) Serial.println("Connect Failed"); else if (error == OTA_RECEIVE_ERROR) Serial.println("Receive Failed"); else if (error == OTA_END_ERROR) Serial.println("End Failed"); }); ArduinoOTA.begin(); Serial.println("Ready"); Serial.print("IP address: "); Serial.println(WiFi.localIP()); //-----------------------------------------add your code here webPage += "<h1>ESP8266 Web Server</h1><p>Socket #1 "; webPage += "<a href=\"socket1On\"><button>ON</button></a> "; webPage += "<a href=\"socket1Off\"><button>OFF</button></a></p>"; if (mdns.begin("esp8266", WiFi.localIP())) Serial.println("MDNS responder started"); server.on("/", [](){ server.send(200, "text/html", webPage); }); server.on("/socket1On", [](){ server.send(200, "text/html", webPage); // Turn off LED digitalWrite(16, HIGH); delay(1000); }); server.on("/socket1Off", [](){ server.send(200, "text/html", webPage); //Turn on LED digitalWrite(16, LOW); delay(1000); }); server.begin(); //-------------------------------------------add your code here } void loop() { ArduinoOTA.handle(); //-------------------------------------------add your code here server.handleClient(); }
After upload via wifi, check it out to see if local web is work or not

Result video
Great Article
ReplyDeleteInternet of Things Final Year Project
Final Year Project Centers in Chennai