
Basically how it works, is u type in two Feeding Times, for example 8:30 and 17:30, then when time is right stepper motor enables and feeds your little pet.
Electric Components:
Stepper Motor NEMA17 - 42HB34F08AB
Stepper Motor Driver A4988
Arduino UNO
Arduino Keypad 4x4
RTC DS3231 Clock
LCD Display 16x2
Step Down Module (I used LM2596S DC/DC) 12V to 5V
12V Power Supply
a lot of wires
Step 1: Printing All Parts

Printing all the parts took me about 5 days. To assemble everything together I used 3mm bolts (m3) and 3mm nuts.
Attachments
main pipe.stl Download
nema 17 mount.stl Download
pipe extension.stl Download
screw nema 17 5mm and nut.stl Download
support 1.stl Download
support 2.stl Download
tank crater (floor).stl Download
tank roof.stl Download
tank walls.stl Download
top part main pipe.stl Download
box roof.stl Download
box wall.stl Download
cap.stl Download
big box.stl Download
Step 2: Electronics
Wire everything like in the circuit. If your LCD screen is too dark or too bright try different values of resistors or play with the voltage regulator.


Step 3: Arduino Code
Arduino Code includes additional libraries: DS3231 RTC, Arduino Keypad 4x4
When you press 'A' - Program asks for first feed time and waits untill you type in HH:MM:SS
When you press 'B' - Program asks for second feed time and waits untill you type in HH:MM:SS
When you press 'C' - Stepper Motor runs for one cycle (one feed)
When you press 'D' - LCD displays current Date
LCD displays normally current Time and hour and minutes of first and second feed time.
#include <DS3231.h>
#include <LiquidCrystal.h>
#include <Keypad.h>


const byte ROWS = 4;
const byte COLS = 4;
const int stepPin = 10;
const int dirPin = A3;

char keys[ROWS][COLS] = {
  {'1','2','3','A'},
  {'4','5','6','B'},
  {'7','8','9','C'},
  {'*','0','#','D'}
};
byte rowPins[ROWS] = { 2, 3, 4, 5 };
byte colPins[COLS] = { 6, 7, 8, 9 };

Keypad keypad = Keypad( makeKeymap(keys), rowPins, colPins, ROWS, COLS );
DS3231 rtc(A4, A5);

LiquidCrystal lcd(A0, A1, A2, 11, 12, 13); // (rs, enable, d4, d5, d6, d7)

int feed_time = 2000;    //define how fast stepper motor works
int feed_length = 600;   //define how much steps should your motor do (mine does 200 for full spin)

String feed1;
String feed2;
char key[8];
int j = 0;
char button;


 void setup() {

  rtc.begin();
  lcd.begin(16,2);
  Serial.begin(9600);
  pinMode(A0, OUTPUT);
  pinMode(A1, OUTPUT);
  pinMode(A2, OUTPUT);
  pinMode(stepPin,OUTPUT);
  pinMode(dirPin,OUTPUT);
}

 void loop() {

 lcd.setCursor(0,0);
 lcd.print("Time: ");
 lcd.print(rtc.getTimeStr());
 lcd.setCursor(0,1);
      //lcd.print("Date: ");               //Date to display
      //lcd.print(rtc.getDateStr());
 lcd.print("1)");
 lcd.print(feed1);
 lcd.setCursor(7,1);
 lcd.print(" 2)");
 lcd.print(feed2);
 lcd.setCursor(15,1);
 lcd.print(" ");

 button = keypad.getKey();

 if(button == 'A'){
  lcd.clear();
  lcd.setCursor(0,0);
  lcd.print("HH:MM:SS 1st");
  delay(500);
  j = 0;
  lcd.setCursor(j,1);
  key[0] = keypad.waitForKey();
  lcd.print(key[0]);j++;
  lcd.setCursor(j,1);
  key[1] = keypad.waitForKey();
  lcd.print(key[1]);j++;
  lcd.setCursor(j,1);
  key[2] = ':';
  lcd.print(key[2]);j++;
  lcd.setCursor(j,1);
  key[3] = keypad.waitForKey();
  lcd.print(key[3]);j++;
  lcd.setCursor(j,1);
  key[4] = keypad.waitForKey();
  lcd.print(key[4]);j++;
  lcd.setCursor(j,1);
  key[5] = ':';
  lcd.print(key[5]);j++;
  lcd.setCursor(j,1);
  key[6] = keypad.waitForKey();
  lcd.print(key[6]);j++;
  lcd.setCursor(j,1);
  key[7] = keypad.waitForKey();
  lcd.print(key[7]);
  key[8] = '\0';
  feed1 = String(key);
  delay(1000);
  lcd.clear();
 }

 if(button == 'B'){
  lcd.clear();
  lcd.setCursor(0,0);
  lcd.print("HH:MM:SS 2nd");
  delay(500);
  j = 0;
  lcd.setCursor(j,1);
  key[0] = keypad.waitForKey();
  lcd.print(key[0]);j++;
  lcd.setCursor(j,1);
  key[1] = keypad.waitForKey();
  lcd.print(key[1]);j++;
  lcd.setCursor(j,1);
  key[2] = ':';
  lcd.print(key[2]);j++;
  lcd.setCursor(j,1);
  key[3] = keypad.waitForKey();
  lcd.print(key[3]);j++;
  lcd.setCursor(j,1);
  key[4] = keypad.waitForKey();
  lcd.print(key[4]);j++;
  lcd.setCursor(j,1);
  key[5] = ':';
  lcd.print(key[5]);j++;
  lcd.setCursor(j,1);
  key[6] = keypad.waitForKey();
  lcd.print(key[6]);j++;
  lcd.setCursor(j,1);
  key[7] = keypad.waitForKey();
  lcd.print(key[7]);
  key[8] = '\0';
  feed2 = String(key);
  delay(1000);
  lcd.clear();
 }
 if(button == 'D'){
  lcd.clear();
  lcd.setCursor(0,0);
  lcd.print("Time: ");
  lcd.print(rtc.getTimeStr());
  lcd.setCursor(0,1);
  lcd.print("Date: ");               //Date to display
  lcd.print(rtc.getDateStr());
  delay(5000);
  lcd.clear();
 }
 if(button == 'C'){
 digitalWrite(dirPin,HIGH);        // Enables the motor to move in a particular direction

  for(int x = 0; x < feed_length; x++) {     // Makes 200 pulses for making one full cycle rotation
    digitalWrite(stepPin,HIGH);
    delayMicroseconds(feed_time);
    digitalWrite(stepPin,LOW);
    delayMicroseconds(feed_time);
  }
  delay(1000);
 }
 if (feed1==rtc.getTimeStr())
 {
   digitalWrite(dirPin,HIGH);        // Enables the motor to move in a particular direction

  for(int x = 0; x < feed_length; x++) {     // Makes 200 pulses for making one full cycle rotation
    digitalWrite(stepPin,HIGH);
    delayMicroseconds(feed_time);
    digitalWrite(stepPin,LOW);
    delayMicroseconds(feed_time);
  }
  delay(1000);
 }
 if (feed2==rtc.getTimeStr())
 {
  digitalWrite(dirPin,HIGH);        // Enables the motor to move in a particular direction

  for(int x = 0; x < feed_length; x++) {     // Makes 200 pulses for making one full cycle rotation
    digitalWrite(stepPin,HIGH);
    delayMicroseconds(feed_time);
    digitalWrite(stepPin,LOW);
    delayMicroseconds(feed_time);
  }
  delay(1000);
 }
 }
Attachments
Attachments: dog_feeder_keypad_lcd_stepper_motor.ino
Step 4: Set the Time and Date for DS3231 RTC Module
Set the Time and Date for DS3231 RTC Module

Here is code for setting the Time and Date in your DS3231 (it includes library like in the previous step) - DS3231 library
The DS3231 SDA ---> A4 in Arduino
The DS3231 SCL ---> A5 in Arduino
When you write that code into Arduino, you have to open the serial monitor (115200) and just check if your time and date match.
#include <DS3231.h>

// Init the DS3231 using the hardware interface
DS3231  rtc(A4, A5);

void setup()
{
  // Setup Serial connection
  Serial.begin(115200);

  // Initialize the rtc object
  rtc.begin();

  // Write your current time and date to this following lines
  rtc.setDOW(MONDAY);     // Set Day-of-Week to Monday
  rtc.setTime(12, 0, 0);     // Set the time to 12:00:00 (24hr format)
  rtc.setDate(01, 01, 2014);   // Set the date to January 1st, 2014
}

void loop()
{
  // Send Day-of-Week
  Serial.print(rtc.getDOWStr());
  Serial.print(" ");

  // Send date
  Serial.print(rtc.getDateStr());
  Serial.print(" -- ");

  // Send time
  Serial.println(rtc.getTimeStr());

  // Wait one second before repeating :)
  delay (1000);
}<br>
Attachments
Attachments: DS3231_Set_Time.ino
Step 5: Screw Mechanism

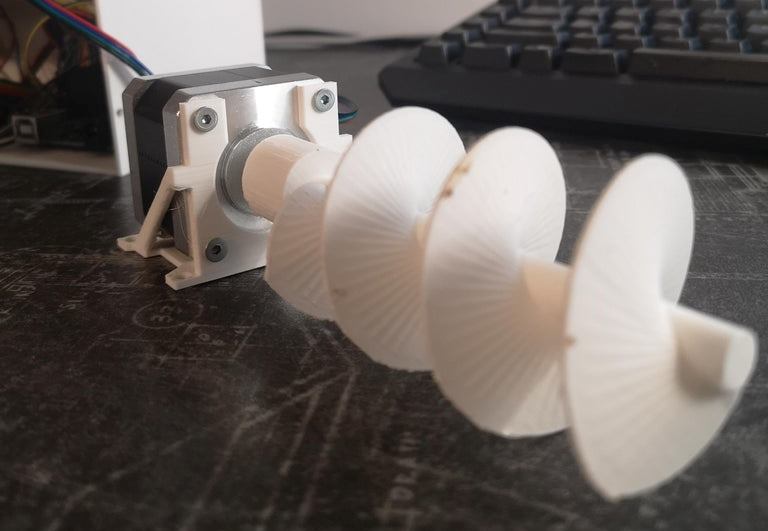
You just put a nut in hole and screw it with all your force. It keeps screw and motor shaft together and tight. 3D printing that screw was a little harder than I thought. I'm using Ender 3 and I couldn't print it standing (vertically). Model was just collapsing. The only way, that was working for me, was printing it horizontally with support blocks like on photos.
Step 6. Finish
Install parts all together and enjoy your own product!


0 Comments: