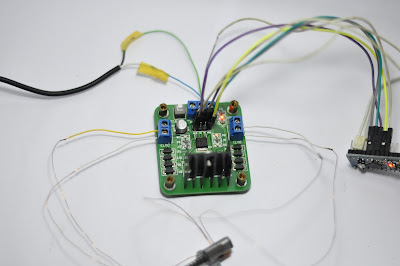
This project will make stepper motor run -> this is a basic step to make CNC machine.
This project will need:
1. Arduino Pro Mini
2. H-brige L298N
3. Stepper motor
 |
| H-bridge L298N |
 |
| Arduino Pro Mini |
 |
| Bipolar stepper motor |
1. Bipolar stepper motor
There are many document over Internet about stepper motor, you can search yourself.It has 2 coils, which is ON and change direction synchronized to make rotor run forward/ backward by pulse of controller, this case is Arduino.
Each pulse will rotate rotor each moving, called step -> by this way, rotor can be controlled it's position by pulse -> main application of stepper motor: can control position!
H -bridge will control pulse of each coil.
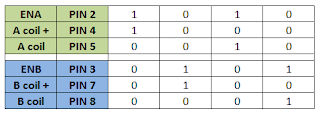
Basically, there are many pulse pattern for stepper motor, we can see some here:
I copy those pattern on Internet, it said:
1. One phase mode, draws the least current, and provides less torque than the two phase mode
2. Half stepping mode, gives more steps per revolution, but provides less torque.
In this project, i choose "one phase" mode
Stepper motor has 4 pin, which is for A and B coil. Using volt-meter to find coil. Direction of coil (A+, B+), i just choose it by chance!
2. Circuit
Make connection as above picture, where pin is connected to H-bridge PCB
3. Code works
const byte pin_A1 = 4;
const byte pin_A2 = 5;
const byte pin_ENA = 2;

const byte pin_B1 = 7;
const byte pin_B2 = 8;
const byte pin_ENB = 3;

const byte speed_motor = 10;

void setup() {
  pinMode(pin_A1,OUTPUT);
  pinMode(pin_A2,OUTPUT);
  pinMode(pin_ENA,OUTPUT);

  pinMode(pin_B1,OUTPUT);
  pinMode(pin_B2,OUTPUT);
  pinMode(pin_ENB,OUTPUT);

  // start serial port at 9600 bps:
  Serial.begin(9600);


  while (!Serial) {
    ; // wait for serial port to connect. Needed for native USB port only
  }

}

void loop() {
  run_forward();
}

void run_forward()
{
  digitalWrite(pin_ENA,1);
  digitalWrite(pin_A1,1);
  digitalWrite(pin_A2,0);
  digitalWrite(pin_ENB,0);
  digitalWrite(pin_B1,0);
  digitalWrite(pin_B2,0);
  delay(speed_motor);
  digitalWrite(pin_ENA,0);
  digitalWrite(pin_A1,0);
  digitalWrite(pin_A2,0);
  digitalWrite(pin_ENB,1);
  digitalWrite(pin_B1,1);
  digitalWrite(pin_B2,0);
  delay(speed_motor);
  digitalWrite(pin_ENA,1);
  digitalWrite(pin_A1,0);
  digitalWrite(pin_A2,1);
  digitalWrite(pin_ENB,0);
  digitalWrite(pin_B1,0);
  digitalWrite(pin_B2,0);
  delay(speed_motor);
  digitalWrite(pin_ENA,0);
  digitalWrite(pin_A1,0);
  digitalWrite(pin_A2,0);
  digitalWrite(pin_ENB,1);
  digitalWrite(pin_B1,0);
  digitalWrite(pin_B2,1);
  delay(speed_motor);
}

void run_backward()
{
  digitalWrite(pin_ENA,0);
  digitalWrite(pin_A1,0);
  digitalWrite(pin_A2,0);
  digitalWrite(pin_ENB,1);
  digitalWrite(pin_B1,1);
  digitalWrite(pin_B2,0);
  delay(speed_motor);
  digitalWrite(pin_ENA,1);
  digitalWrite(pin_A1,1);
  digitalWrite(pin_A2,0);
  digitalWrite(pin_ENB,0);
  digitalWrite(pin_B1,0);
  digitalWrite(pin_B2,0);
  delay(speed_motor);
  digitalWrite(pin_ENA,0);
  digitalWrite(pin_A1,0);
  digitalWrite(pin_A2,0);
  digitalWrite(pin_ENB,1);
  digitalWrite(pin_B1,0);
  digitalWrite(pin_B2,1);
  delay(speed_motor);
  digitalWrite(pin_ENA,1);
  digitalWrite(pin_A1,0);
  digitalWrite(pin_A2,1);
  digitalWrite(pin_ENB,0);
  digitalWrite(pin_B1,0);
  digitalWrite(pin_B2,0);
  delay(speed_motor);
}
Above code has sub-function run forward and backward. But only "forward run" is used.
Basically, code will make pulse as "one phase mode":


how much current does the forward squens draw? can i build a H-Bridge from scratch? I have arduino uno.
ReplyDeleteHi, i didn't measure current. But we can do a math to calculate:
DeleteVoltage supply for H-bridge is 6VDC. Each (A & B) motor coil is 13Ohm, each pulse run continuously. So current will draw: I = 6VDC/13Ohm = 0.46A
You definitely can make H-bridge. But in order to save time, you should purchase an H-bridge.
Arduino UNO can also run this code.
I also have the same question as the above commentor, i find the answer. Thanks
ReplyDeleteThis is such a great resource that you are providing and you give it away for free. I love seeing blog that understand the value of providing a quality resource for free. dvd duplication services
ReplyDeletehis is my survey of the Sony BDP-BX37 Blu Ray Player (BDPS370 equal). Connections for the Blu Rays Sams Club: http://www.samsclub.co click this over here now
ReplyDeleteThis is a wonderful article, Given so much info in it, These type of articles keeps the users interest in the website, and keep on sharing more ... good luck. ซื้อประกันรถยนต์ชั้น 1
ReplyDeleteYes i am totally agreed with this article and i just want say that this article is very nice and very informative article.I will make sure to be reading your blog more. You made a good point but I can't help but wonder, what about the other side? !!!!!!Thanks best4k blu-ray player
ReplyDeleteI can see that you are an expert at your field! I am launching a website soon, and your information will be very useful for me.. Thanks for all your help and wishing you all the success in your business. 4k player
ReplyDeleteThereby, it enhances health and wellness of the people. exercise equipment
ReplyDeleteI wish more authors of this type of content would take the time you did to research and write so well. I am very impressed with your vision and insight. Automatic Car Sales Reading
ReplyDeleteI would like to say that this blog really convinced me to do it! Thanks, very good post. uhd player
ReplyDeleteThis drawback is overcome in high definition DVD players where the quality of the picture is at its best and when they play high definition DVDs, the output is enhanced to a greater extent. dvd player for tv
ReplyDelete